
Digging deep into Windows 10
Digging deep into Windows 10
Despite still being very much an early preview, Windows 10 is already brimming with handy new featues, along with new tweaks and tricks—and, because the operating is still in preview, a handful of those tricks unlock powerful functionality hidden to everyday users.
Others, though, simply let you mold some of Windows 10’s new features into the shape you see fit. Here are some of the most useful Windows 10 tweaks, tricks, and tips we’ve found. Be warned: Some of these may break as the operating system evolves, though we plan to update this article over time. Got any tricks of your own? Share them in the comments!

Others, though, simply let you mold some of Windows 10’s new features into the shape you see fit. Here are some of the most useful Windows 10 tweaks, tricks, and tips we’ve found. Be warned: Some of these may break as the operating system evolves, though we plan to update this article over time. Got any tricks of your own? Share them in the comments!

Make Cortana's ears perk up
Make Cortana's ears perk up
Cortana’s finally made
the leap to the PC in Windows 10, assuming many of the operating
system’s search functions, even though her first iteration could still use some polish. (That’s what Previews are for!) But by default, she doesn’t listen for your commands.
If you’d like to be able to just bark commands at your PC, open Cortana by clicking the search field in the taskbar and select the three-lined options menu in the upper-left corner. Select Settings for the list, then simply enable the “Let Cortana respond when you say ‘Hey Cortana’” option. You’ll need an active microphone for this to work, of course.
While you’re poking around Cortana’s options, you can dive into the Notebook menu to fine-tune exactly what personal data Microsoft’s digital assistant can access. Remember, however, that like Google Now, Cortana’s effectiveness is directly related to how much she knows about you.

Give touch-friendly Office apps a whirl
Give touch-friendly Office apps a whirl
First, the good news: Touch-friendly Office apps
are finally nearing completion, in the form of universal apps for
Windows 10 devices of any size and shape. Now, the better news:
Microsoft’s released beta previews of the touch-friendly Word, Excel,
and Powerpoint apps for Windows 10 testers to use at no cost.
You won’t find them in the stable, green-tiled Windows Store, however. You have to venture into the grey-tiled beta Windows Store app to grab the Office previews.

You won’t find them in the stable, green-tiled Windows Store, however. You have to venture into the grey-tiled beta Windows Store app to grab the Office previews.

Make Mail your own
Make Mail your own
Windows 10 Preview build 10061 introduced overhauled Mail and Calendar apps, and they rock
compared to Windows 8’s lackluster offerings. They’re lightning fast,
more full-featured, and infinitely more mouse-friendly than before.
Even better, the new Mail adds customization options that let you put a personal touch on the app. Not only can you change the image in the preview pane with the picture of your choice, but you can also configure how Mail behaves when you perform on of its new swipe gestures on a message.
To start tinkering, click the cog icon in the lower-left corner of the app, then select Options. Wah-lah! You’ll find all the gesture options in the Quick Actions portion.

Turn off File Explorer's Quick Access view
Turn off File Explorer's Quick Access view
When you open File
Explorer in Windows 10, it defaults to a new Quick Access view that
shows your most frequently accessed folders and recently viewed files. I
love it, personally, but if you’d rather File Explorer defaulted to the
“This PC” view found in Windows 8, here’s how.
Open File Explorer, then select View > Options from the Ribbon. A Folder Options window will open. Click the “Open File Explorer” drop-down menu at top, then select the “This PC” option. Click OK and you’re done!

Open File Explorer, then select View > Options from the Ribbon. A Folder Options window will open. Click the “Open File Explorer” drop-down menu at top, then select the “This PC” option. Click OK and you’re done!

Secret, powerful new command line tools
Secret, powerful new command line tools
Windows 10 packs a
slew of nifty new command line features, including—hallelujah!—the
ability to copy and paste inside the command prompt with Crtl + C and Crtl + V.
To activate the goodies, open the command prompt. Right-click its title bar, then select Properties. You can find and enable the new features under the Experimental tab.

To activate the goodies, open the command prompt. Right-click its title bar, then select Properties. You can find and enable the new features under the Experimental tab.

Schedule your restarts
Schedule your restarts
This is wonderful.
If you’ve got pending updates that require you to reboot your PC,
Windows 10 will allow you to schedule a specific time for it to do so.
Finally!
Open the Settings option in the Start menu, then head to Updates and Recovery > Windows Update. If you have an update pending, you’ll see the screen at left, which lets you schedule your reboot after you select the “Select a restart time” radio button.

Open the Settings option in the Start menu, then head to Updates and Recovery > Windows Update. If you have an update pending, you’ll see the screen at left, which lets you schedule your reboot after you select the “Select a restart time” radio button.

Get Windows Updates from other sources
Get Windows Updates from other sources
But the Windows Update upgrades don’t end there. Build 10041—released
mid-March—introduced a new option that lets you download updates using
peer-to-peer technology, rather than Microsoft directly. It could help
you get that hot security patch faster when everybody’s hammering
Microsoft’s dedicated servers, or save you bandwidth in a
computer-crowded house—just download the new patch once from Microsoft,
then share it among the PCs under your care.
To tinker with the setting, head to Settings > Update & Recovery > Windows Update > Advanced Options > Choose how you download updates. By default, “Get updates from more than one place” is enabled and configured to grab updates from PCs on both your local network and the Internet at large.

To tinker with the setting, head to Settings > Update & Recovery > Windows Update > Advanced Options > Choose how you download updates. By default, “Get updates from more than one place” is enabled and configured to grab updates from PCs on both your local network and the Internet at large.

Fresh keyboard shortcuts!
Fresh keyboard shortcuts!
Windows 10 packs a
handful of fresh keyboard shortcuts, all tied to newfound abilities
inside the revamped operating system. There are many more than we can
list here, so head over to PCWorld’s guide to Windows 10’s keyboard shortcuts to learn all about them.


GodMode
GodMode
The legendary GodMode, a hidden staple for Windows power users, makes its return in Windows 10.
As before, activating it unveils a power user menu that brings together
all of your system’s far-flung settings and configuration options into a
single location. Just create a new folder and rename it to following
GodMode.{ED7BA470-8E54-465E-825C-99712043E01C}
Don’t forget the period after “GodMode”, and you can rename the “GodMode” portion whatever you’d like if you want another name for the folder.

GodMode.{ED7BA470-8E54-465E-825C-99712043E01C}
Don’t forget the period after “GodMode”, and you can rename the “GodMode” portion whatever you’d like if you want another name for the folder.

Solitaire returns!
Solitaire returns!
After being banished to the Windows Store in Windows 8, Solitaire is back in Windows 10, baby. But it can be tricky to find.
Solitaire’s not in the Start menu, and its old Start > Programs> Accessories > Games stomping grounds aren’t found in Windows 10. Looking for Solitaire in the All Apps section of the Start menu is also a fruitless endeavor—but that’s because the game’s officially called “Microsoft Solitaire Collection Preview.” You can find that in All Apps, or just search for Solitaire. It’ll pop right up.
Enjoy!

Move open windows between virtual desktops
Move open windows between virtual desktops
Virtual desktops let
you segregate your open apps into discrete areas—literally multiple,
virtualized versions of your PC’s desktops. Switching between open
virtual desktops is easy enough using Task View (the button that looks
like two panels, one over the other, in the taskbard) or Windows key + Tab, while Alt + Tab
jumps you between open apps across all desktops. There’s also a way to
actually shift an open app from one virtual desktop to another if you’d
like to shuffle things around.
First, head to the virtual desktop housing the app you’d like to move to another virtual desktop, then open the Task View interface. Just click-and-hold on the app you’d like to move, then drag it to the desired virtual desktop at the bottom of the screen. You can also drag it to the “+New Desktop” option in the lower-right corner to create a new virtual desktop for the app.

First, head to the virtual desktop housing the app you’d like to move to another virtual desktop, then open the Task View interface. Just click-and-hold on the app you’d like to move, then drag it to the desired virtual desktop at the bottom of the screen. You can also drag it to the “+New Desktop” option in the lower-right corner to create a new virtual desktop for the app.

SOS
SOS
Did you break something in Windows 10 or one of your Microsoft accounts? Don’t sweat it—help is just a few clicks away.
If you’re running build 10061 or later, just look for the new Contact Support app inside the All Apps menu. It can point you towards the appropriate community forums to find help for the issue, or even connect you with a Microsoft support representative via online chat or phone if you stumble into a particularly bad problem (though attempting to use the call option currently generates an error).
If you’re running build 10061 or later, just look for the new Contact Support app inside the All Apps menu. It can point you towards the appropriate community forums to find help for the issue, or even connect you with a Microsoft support representative via online chat or phone if you stumble into a particularly bad problem (though attempting to use the call option currently generates an error).

Disable the Photos app's auto-enhance
Disable the Photos app's auto-enhance
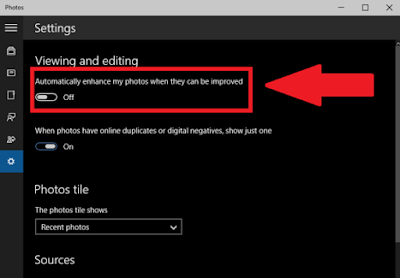
Windows 10’s Photos
app has been rebuilt as a universal app that scales across device types.
It’s still more than a bit buggy, but one notable feature already
stands out: It will automatically auto-enhance your pictures for clarity
and punch.
If you’d rather Photos left your pictures alone, open the app’s Settings—symbolized by a gear in the left-hand column. Under the Viewing & Editing section, simply disable the “Automatically enhance my photos when they can be improved” option.

If you’d rather Photos left your pictures alone, open the app’s Settings—symbolized by a gear in the left-hand column. Under the Viewing & Editing section, simply disable the “Automatically enhance my photos when they can be improved” option.
Offline Maps
Offline Maps
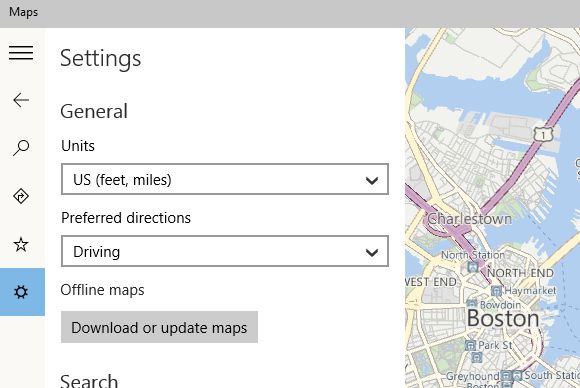
Speaking of apps, the revamped universal Maps app, like any maps tool worth using (and unlike the Windows 8 Maps app), packs an offline maps feature. Click the Settings (gear) icon in Maps, then select Download or update maps under the “Offline maps” header.
You’ll be bounced to the Settings app, where you’ll be able to select which continent, then country whose offline map you’d like to download. (If you’re downloading a U.S. map, you'll also have to select which state you need.) Helpfully, Windows tells you how large the download will be before you start scraping the maps.
You’ll be bounced to the Settings app, where you’ll be able to select which continent, then country whose offline map you’d like to download. (If you’re downloading a U.S. map, you'll also have to select which state you need.) Helpfully, Windows tells you how large the download will be before you start scraping the maps.

Declutter your taskbar
Declutter your taskbar
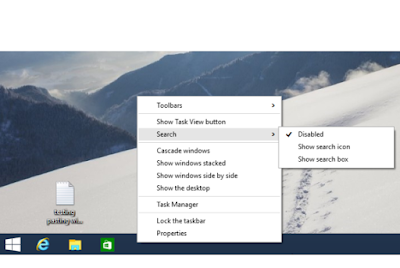
Two of Windows 10’s standout features
are its Cortana search integration and newly added virtual desktop
support—but they claim a sizeable chunk of your taskbar. If you don’t
care about either (or don’t mind using Windows key + Tab to leap through virtual desktops) you can reclaim that onscreen real estate.
Everything starts by right-clicking an empty section of your taskbar. In the menu that appears, deselecting “Show Task View” eliminates the Task View (virtual desktop) icon, while selecting Search > Disabled removes Cortana’s “Ask me anything” box.

Everything starts by right-clicking an empty section of your taskbar. In the menu that appears, deselecting “Show Task View” eliminates the Task View (virtual desktop) icon, while selecting Search > Disabled removes Cortana’s “Ask me anything” box.

Chameleon
Chameleon
The customization
doesn't end there. As of build 10061, Windows 10 offers you more
granular control over the color of your taskbar, Start menu, and search
field.
Open the Start menu and head to Settings > Personalization > Colors to start tweaking things. The “Automatically pick a color from my background” option does what it claims, then applies that color to the Cortana/search field and underneath the icons of open apps. “Show color on taskbar and Start menu” also does just that, while disabling “Make Start menu transparent”—which is enabled by default—removes the subtle see-through effect in favor of a full-blown opaque background for both the Start menu and the taskbar.
Open the Start menu and head to Settings > Personalization > Colors to start tweaking things. The “Automatically pick a color from my background” option does what it claims, then applies that color to the Cortana/search field and underneath the icons of open apps. “Show color on taskbar and Start menu” also does just that, while disabling “Make Start menu transparent”—which is enabled by default—removes the subtle see-through effect in favor of a full-blown opaque background for both the Start menu and the taskbar.

Enable Tablet Mode
Enable Tablet Mode
Windows 10’s
Continuum, which dynamically switches from the traditional desktop to a
more Metro-like interface when you’re using a touchscreen, is supposed
to kick into action when you connect or disconnect a keyboard from your
Windows hybrid or tablet. But what if you’re using a standard PC and
just plain love full-screen apps and the Live-Tile-strewn Start screen,
rather than the Start menu?
Easy! Activate Tablet Mode. Open up Windows 10’s new Action Center—the small icon that looks like a comic-book word bubble in your system tray—and click the Tablet Mode button. Everything will be removed from your desktop, save for spaced-out icons for the Start button, Cortana, and Task View. (Want your open and pinned apps to stay on the taskbar? The option's found in Tablet Mode settings, which we cover later.) Now press the Start button to bask in the full-screen apps and Start screen, since that's obviously your thing.
Easy! Activate Tablet Mode. Open up Windows 10’s new Action Center—the small icon that looks like a comic-book word bubble in your system tray—and click the Tablet Mode button. Everything will be removed from your desktop, save for spaced-out icons for the Start button, Cortana, and Task View. (Want your open and pinned apps to stay on the taskbar? The option's found in Tablet Mode settings, which we cover later.) Now press the Start button to bask in the full-screen apps and Start screen, since that's obviously your thing.
No comments:
Post a Comment